Setting up a Private WebPageTest instance
Published: Mon Jun 26 2023This document explains the steps which were taken to set up a private WPT instance on an Ubuntu 22.04 Server.
Virtual Machine
The recommended approach is to set up WPT on a virtual machine rather than your machine. This could be an EC2 machine or a virtual machine. In this tutorial, I am using virt-manager on an Ubuntu host.
When setting up virt-manager, it is recommended to enable File System passthrough.
- Enable Shared Memory
- Setup a File System passthrough using
virtiofs - After installation is complete configure it to automatically mount the shared drive:
$ sudo nano /etc/fstab
Add the following line:
QEMU /mnt virtiofs rw,_netdev 0 0
You may also need to enable IP forwarding on your host machine if it is disabled
sudo sysctl -w net.ipv4.ip_forward=1
sudo systemctl restart libvirtd
WPT Server
The first step is to set up a WebPageTest server. The WebPageTest server hosts the PHP files which are used to show the user the WPT interface as well as run PHP scripts.
webpagetest has the following branches:
master- used on www, not for commercial use (recommended for personal use)release- rebased frommaster(might be outdated)apache- uses the Apache license. Can be used for commercial purposes
To install the WebPageTest server, you can use the install script provided by webpagetest. The below script is taken from wptserver-install but uses the master branch
#!/bin/bash

#**************************************************************************************************
# Configure Defaults
#**************************************************************************************************
set -eu
: ${WPT_BRANCH:='master'}

# Prompt for the configuration options
echo "WebPageTest automatic server install."

# Pre-prompt for the sudo authorization so it doesn't prompt later
sudo date

cd ~
until sudo apt-get update
do
    sleep 1
done
until sudo DEBIAN_FRONTEND=noninteractive apt-get -yq -o Dpkg::Options::="--force-confdef" -o Dpkg::Options::="--force-confold" dist-upgrade
do
    sleep 1
done
until sudo apt-get install -y git screen nginx beanstalkd zip unzip curl \
    php-fpm php-apcu php-sqlite3 php-curl php-gd php-zip php-mbstring php-xml php-redis \
    imagemagick ffmpeg libjpeg-turbo-progs libimage-exiftool-perl \
    software-properties-common psmisc
do
    sleep 1
done
sudo chown -R $USER:$USER /var/www
cd /var/www
until git clone --depth 1 --branch=$WPT_BRANCH https://github.com/WPO-Foundation/webpagetest.git
do
    sleep 1
done
until git clone https://github.com/WPO-Foundation/wptserver-install.git
do
    sleep 1
done

# Configure the OS and software
cat wptserver-install/configs/sysctl.conf | sudo tee -a /etc/sysctl.conf
sudo sysctl -p
mkdir -p /var/www/webpagetest/www/tmp
cat wptserver-install/configs/fstab | sudo tee -a /etc/fstab
sudo mount -a
cat wptserver-install/configs/security/limits.conf | sudo tee -a /etc/security/limits.conf
cat wptserver-install/configs/default/beanstalkd | sudo tee /etc/default/beanstalkd
sudo service beanstalkd restart

#php
PHPVER=$(find /etc/php/8.* /etc/php/7.* -maxdepth 0 -type d | head -n 1 | tr -d -c 0-9\.)
cat wptserver-install/configs/php/php.ini | sudo tee /etc/php/$PHPVER/fpm/php.ini
cat wptserver-install/configs/php/pool.www.conf | sed "s/%USER%/$USER/" | sudo tee /etc/php/$PHPVER/fpm/pool.d/www.conf
sudo service php$PHPVER-fpm restart

#nginx
cat wptserver-install/configs/nginx/fastcgi.conf | sudo tee /etc/nginx/fastcgi.conf
cat wptserver-install/configs/nginx/fastcgi_params | sudo tee /etc/nginx/fastcgi_params
cat wptserver-install/configs/nginx/nginx.conf | sed "s/%USER%/$USER/" | sudo tee /etc/nginx/nginx.conf
cat wptserver-install/configs/nginx/sites.default | sudo tee /etc/nginx/sites-available/default
sudo service nginx restart

# WebPageTest Settings
LOCATIONKEY=$(cat /dev/urandom | tr -dc 'a-zA-Z0-9' | fold -w 32 | head -n 1)
SERVERKEY=$(cat /dev/urandom | tr -dc 'a-zA-Z0-9' | fold -w 32 | head -n 1)
SERVERSECRET=$(cat /dev/urandom | tr -dc 'a-zA-Z0-9' | fold -w 32 | head -n 1)
APIKEY=$(cat /dev/urandom | tr -dc 'a-zA-Z0-9' | fold -w 32 | head -n 1)
cat wptserver-install/webpagetest/settings.ini | sed "s/%LOCATIONKEY%/$LOCATIONKEY/" | tee /var/www/webpagetest/www/settings/settings.ini
cat wptserver-install/webpagetest/keys.ini | sed "s/%SERVERSECRET%/$SERVERSECRET/" | sed "s/%SERVERKEY%/$SERVERKEY/" | sed "s/%APIKEY%/$APIKEY/" | tee /var/www/webpagetest/www/settings/keys.ini
cat wptserver-install/webpagetest/locations.ini | tee /var/www/webpagetest/www/settings/locations.ini
cp /var/www/webpagetest/www/settings/connectivity.ini.sample /var/www/webpagetest/www/settings/connectivity.ini

# Crontab to tickle the WebPageTest cron jobs every 5 minutes
CRON_ENTRY="*/5 * * * * curl --silent http://127.0.0.1/work/getwork.php"
( crontab -l | grep -v -F "$CRON_ENTRY" ; echo "$CRON_ENTRY" ) | crontab -

clear
echo 'Setup is complete. System reboot is recommended.'
echo 'The locations need to be configured manually in /var/www/webpagetest/www/settings/locations.ini'
echo 'The settings can be tweaked in /var/www/webpagetest/www/settings/settings.ini'
printf "\n"
echo "The location key to use when configuring agents is: $LOCATIONKEY"
echo "An API key to use for automated testing is: $APIKEY"
After installation is successful, you are prompted to reboot.
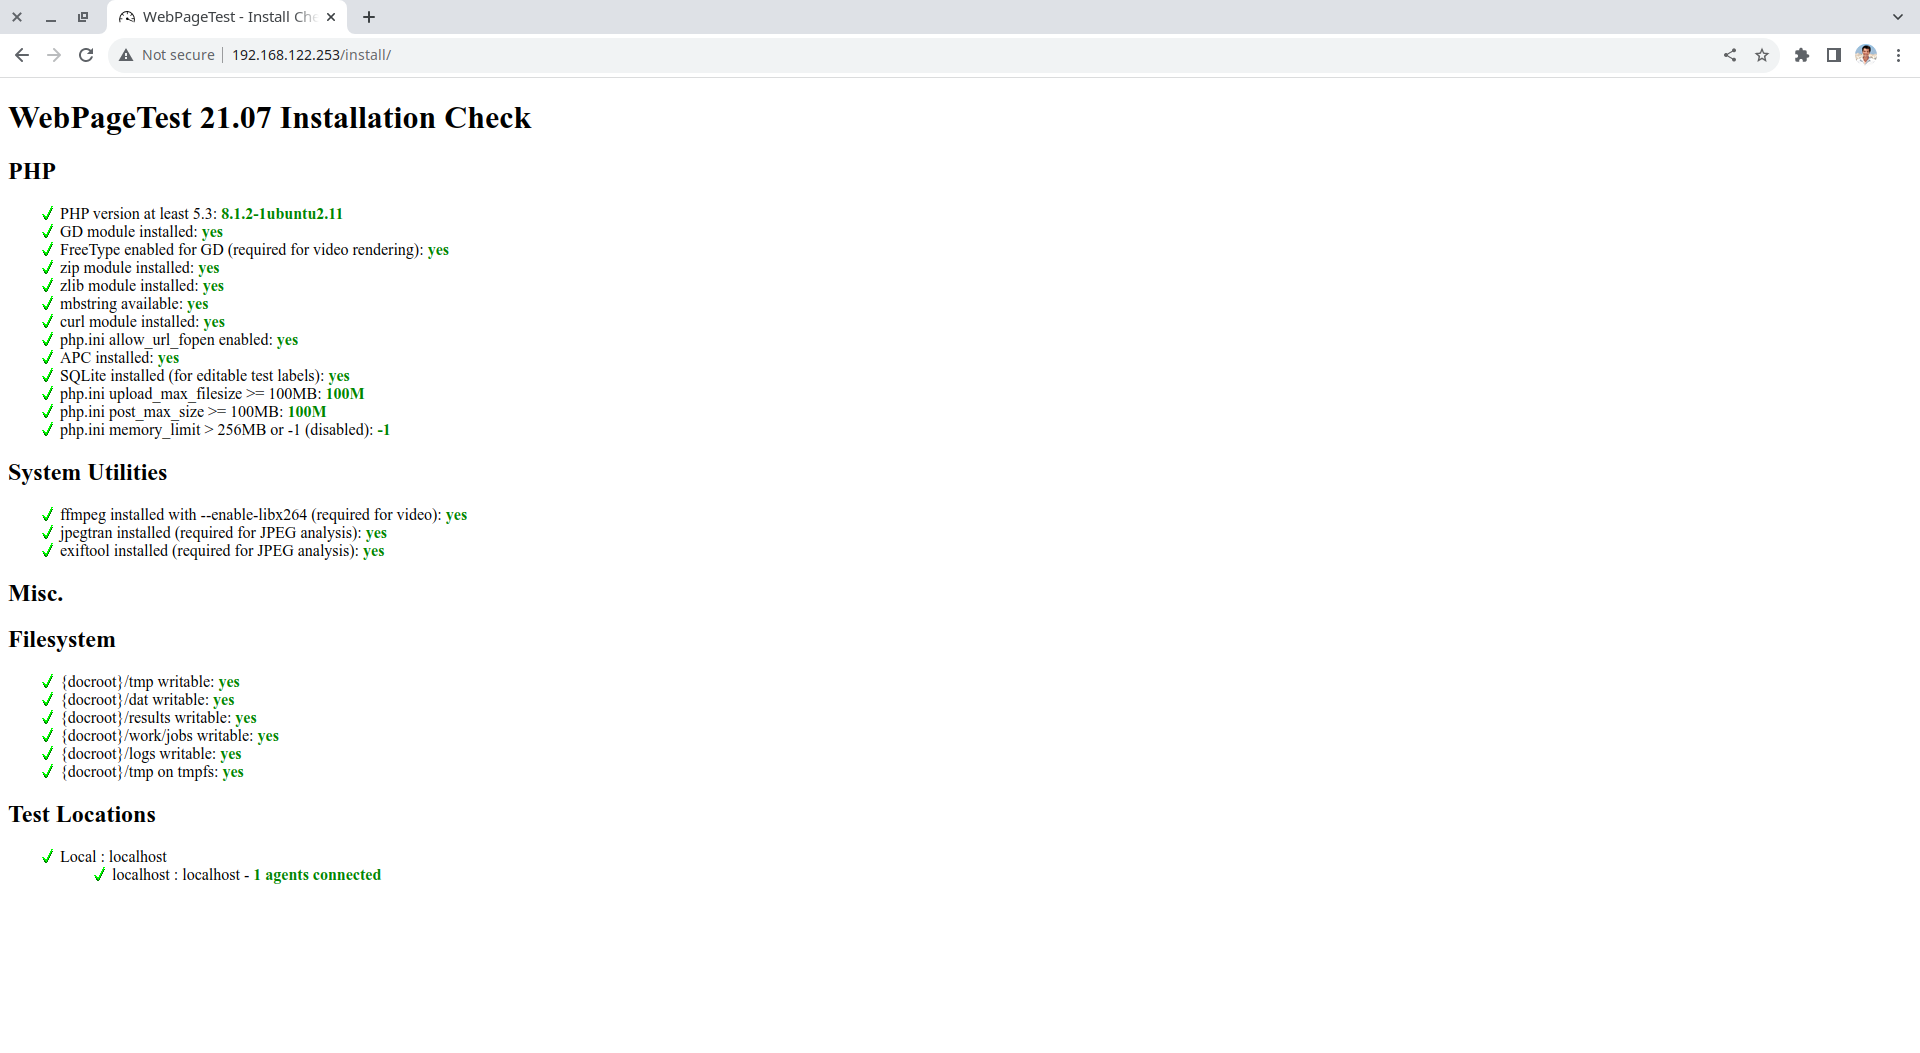
After rebooting, navigating to the IP address of the virtual machine should show you the WebPageTest interface. Navigating to /install will show you a checklist of dependencies and prerequisites which were configured during the installation.
I also recommend setting display_errors = on in php.ini to see any PHP errors in the browser.
WPT Agent
The WPT Agent is the location from where the tests are run. You may have multiple agents for a single WebPageTest server. This may be useful if you want to test from multiple locations. In this tutorial, you are going to set up a single location with Chrome and Firefox on the same virtual machine as the wptserver. If the WPT agent is hosted on a different machine, you just need to update the configurations.
You can run the following script which sets up the configurations before calling the wptagent-install script. The WPT_KEY must be taken from the WPT server, /var/www/webpagetest/www/settings/settings.ini.
#! /bin/bash

WPT_SERVER="127.0.0.1" \
WPT_LOCATION="localhost" \
WPT_KEY="{WPT_KEY}" \
DISABLE_IPV6=y \
WPT_BRAVE='n' \
WPT_EPIPHANY='n' \
WPT_EDGE='n' \
bash <(curl -s https://raw.githubusercontent.com/WPO-Foundation/wptagent-install/master/debian.sh)
After the agent has finished installing, you will be prompted to reboot.
After rebooting, the OS will execute the script ~/agent.sh. This script initiates the WPT agent. If you do not use HTTPS on 127.0.0.1, you may need to update the agent.sh script to remove https as per below.
python3 wptagent.py -vvvv --server "http://127.0.0.1/work/" --location localhost --key {WPT_KEY} --exit 60 --alive /tmp/wptagent
You can confirm that the agent is running by accessing the nginx logs:
$ tail -f /var/logs/nginx/access.log

127.0.0.1 - - [02/Mar/2023:12:16:26 +0000] "GET /work/getwork.php?f=json&shards=1&reboot=1&servers=1&testinfo=1&location=localhost&pc=webpagetest-192.168.122.253&key={WPT_KEY}&version=230215.171357&dns=127.0.0.53&freedisk=6.641&upminutes=26 HTTP/1.1" 200 5 "-" "wptagent"
127.0.0.1 - - [02/Mar/2023:12:16:31 +0000] "GET /work/getwork.php?f=json&shards=1&reboot=1&servers=1&testinfo=1&location=localhost&pc=webpagetest-192.168.122.253&key={WPT_KEY}&version=230215.171357&dns=127.0.0.53&freedisk=6.641&upminutes=26 HTTP/1.1" 200 5 "-" "wptagent"
127.0.0.1 - - [02/Mar/2023:12:16:36 +0000] "GET /work/getwork.php?f=json&shards=1&reboot=1&servers=1&testinfo=1&location=localhost&pc=webpagetest-192.168.122.253&key={WPT_KEY}&version=230215.171357&dns=127.0.0.53&freedisk=6.641&upminutes=26 HTTP/1.1" 200 5 "-" "wptagent"
This access log shows that the WPT Agent is pinging the WPT Server. If there isn’t any traffic you may want to check if the --server URL in the wptagent.py script is correct. If it returns a 500, try opening the URL in the browser and see if it shows any PHP errors.
Locations
Finally, you need to configure the WPT Server to accept traffic from the WPT Agent you have just configured. This is done in /var/www/webpagetest/www/settings/locations.ini. For the above agent configurations, you can copy-paste the following:
[locations]
1=Local
default=Local

[Local]
1=localhost
label=Ubuntu 22.04
group=Virtual Machines

[localhost]
browser=Chrome,Firefox
label="Ubuntu 22.04"
Now that everything is set up, you should be able to confirm that the installation is correct by navigating to /install. Your agent should show up at the end of the checklist.
Limits
Before using your new WPT instance, you might want to revisit the test limits, which default to a maximum of 50 monthly tests. These are configured in /www/settings/settings.ini.
rate_limit_anon_monthly=0
rate_limit_anon=0
You can also set limits on the Web UI or API through the /www/settings/keys.ini file.
Automatic updates
Personally, I recommend disabling automatic updates by commenting out the following line in /www/settings/settings.ini:
gitUpdate=1
Simple Configurations
To create simple configuration presets which show up on the home page, you need to create a /www/settings/profiles.ini file. This file will include a list of presets, including their connection, device, and location.
[MotoG4]
label="<strong><b>MotoG4</b></strong> <img src='/assets/images/test_icons/chrome.svg' alt='chrome'> <span class='test_presets_tag'><img src='/assets/images/test_icons/signal.svg' alt=''>4G</span> <span class='test_presets_tag'>Ubuntu 22.04</span>"
description="Ubuntu 22.04, Simulated MotoG4, 4G Connection, 9 Mbps, 170ms RTT"
location="localhost:Chrome;MotoG4.4G"
runs=3
video=1
timeline=1
fvonly=1
lighthouseTrace=1
In the configuration above, I am creating a configuration named MotoG4 which uses the localhost location with the Chrome browser and emulated MotoG4 with a 4G connection. The label and description affect how the configuration appears on the page, while the runs, video, timeline, fvonly, and lighthouseTrace set some default values.
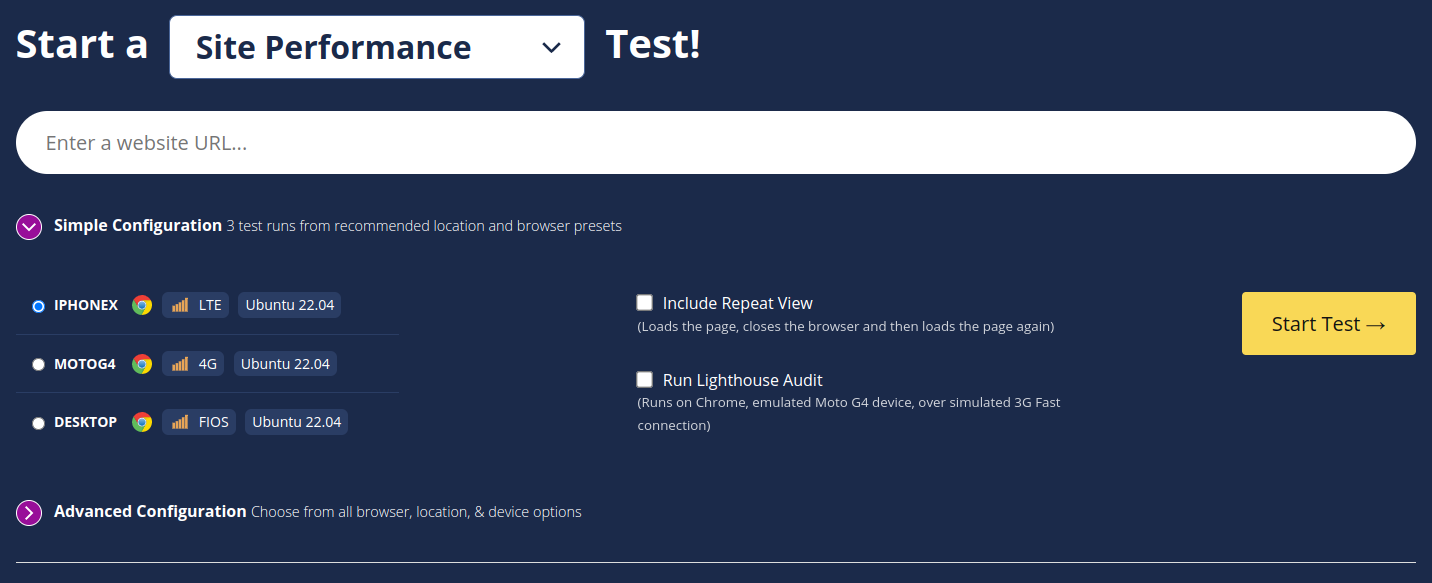
In the screenshot above, you can see three simple configurations—iPhoneX, MotoG4, and Desktop—that were added to profiles.ini.
Happy testing!
Latest Updates
- Improving Largest Contentful Paint on slower devicesSat Mar 09 2024
- Learn Performance course on web.devWed Nov 01 2023
- Setting up a Private WebPageTest instanceMon Jun 26 2023
- First Important Paint - Developing a custom metricSat Jun 10 2023
- Web Performance AuditWed Jun 07 2023